Maintaining Packages
Cherimoya is dependent on a set of precompiled packages. Because the security of all Cherimoya users depend on up-to-date packages, a package maintainer is needed to look out for new versions and security patches.
Contents
What you need
- Any Linux-based system (Arch or Chakra-based recommended)
- Basic knowledge of how to use Git
- Here's a quick tutorial, and the full manual.
- An understanding of how Arch Linux packages work and are made (don't worry, it's extremely easy, more so than MakeFiles)
- A Gitorious account
There is no registration needed to be a package maintainer for Cherimoya. All you need to do is check versions in the PKGBUILDs against the corresponding AUR/CCR package (or in the case of Firefox Addons, Mozilla's addon site), make changes to the PKGBUILD, and then send a merge request. Just do it whenever you feel like it.
Installing Pacman
Because we create a chroot to build a liveCD, any Linux distro from Gentoo to Debian can work on Cherimoya. All you need to do is to install the pacman package manager to your host system.
Gentoo
Gentoo has a pacman package ready to go. Just unmask and emerge it:
# echo sys-apps/pacman >> /etc/portage/package.keywords
# emerge -va sys-apps/pacman
Because Gentoo does not have libfetch, you will need to uncomment one of the two XferCommand lines in /etc/pacman.conf. I recommend using the wget line:
XferCommand = /usr/bin/wget --passive-ftp -c -O %o %u
Other distros
For other distros, such as Debian or Fedora, they either do not have a Pacman package, or it is too old. Not to worry though, just download this script, run it, and pacman will be installed.
Installing the Cherimoya Buildsystem
The Cherimoya Buildsystem is a special chroot environment specially designed for building our packages for any architecture, on any system using GNU utils (Mac OS X, Linux, BSD, etc). It builds any package, signs it, all in a nice clean environment.
First, get the installation script. Then, make it executable with this command:
chmod +x ch-setup.sh
Make sure you've installed Git, and run this command:
./ch-setup.sh repository branch architecture
Where:
- repository is one of the available repositories: cherimoya, cherimoya-firefox, defense, and offense,.
- branch can be:
master(stable),testingorunstable. - architecture can be either
i686orx86_64. - If you have commit rights, you should add a fourth parameter: c. To get those rights, read Template:Link. Basically, run this: ./c-setup.sh repository branch architecture n
The script will ask for your user password. Remember your user must have sudo-rights. Here is an example:
[packager@chakra master]$ ./ch-setup.sh cherimoya master i686

Cherimoya Packager's Chroot Setup Script v0.5.1.0

:: Root                 : /home/iruel/32m/buildroot
:: Chroot Installation  : /home/iruel/32m/buildroot/cherimoya-i686

:: Do you want to continue (y/n)_
Check the paths are correct and enter y and Enter to continue.
If you ran the script with c as fourth parameter, you will be then asked for your SSH password for Git.
Once all packages are downloaded and installed, you'll be asked for your password. It is your user password, not root.
Password:

:: configuring system DONE

User setup

:: adding user: anke DONE
:: you will be asked to enter a password for the chroot user
And later, you will be asked for a new password for the chroot user. You can (and probably should) enter your user password, so your user has the same password in and out of the chroot. Then, enter it again to confirm.
Enter new UNIX password:
Retype new UNIX password:
passwd: password updated successfully

:: setting up /etc/sudoers DONE
:: setting up device permissions DONE
:: unmounting special dirs DONE
After that, the script installs all needed scripts, sets up your makepkg-config and fetches all needed PKGBUILDs. You will be asked for your full name and your email (This is for Git, you can use a pseudonym and a fake email).
:: enter your full name (eg, John Smith): Anke Boersma
:: and your email (eg, jsmith@chakra-project.org): abveritas@chakra-project.org
:: finishing... DONE
And that's it! You have a chroot created and prepared to manage a repository. You can (and should) repeat the process for a different combination of repository and architecture or, in another folder, for a different branch.
(k)eep chroot master-x32 and update it?
(d)elete/reinstall chroot master-x32?
(u)ninstall chroot master-x32?

(q)uit this script? _Adding another chroot
The steps to create a new chroot into a current build system is pretty much the same. You just need to skip the steps to install the buildsystem and download the scripts (since you already downloaded it).
Choose a different repository (available ones are cherimoya, cherimoya-firefox,defense, and offense.)
[packager@chakra master]$ ./c-setup.sh defense master i686
The chroot master-x32 already exists. Do you want to:

(k)eep chroot master-x32 and update it?
(d)elete/reinstall chroot master-x32?
(u)ninstall chroot master-x32?
(q)uit this script?_
You should type k here.
Entering the Chroot
To enter the chroot, use this command (as the normal user):
cd buildroot
./enter-chroot.sh <repository>
Replacing <repository> with any installed chroot, such as "cherimoya-i686".
You will then be asked for your chroot user's password. Then, you'll be into the chroot. You will see the chroot content, and the prompt will be in red, so you know when you are into the chroot.
To ensure your chroot is clean and synced before starting to build and add packages, a good practice is to always use these commands after entering your chroot:
git status # This tells you about the local changes you haven't committed yet.
git pull # Updates your Git copy.
pacman -Sc
pacman -Syu
Exiting the chroot
Just use this command:
exit
Your prompt should no longer be red.
Using the Buildsystem
After entering the chroot, you will see a list of packages in that repository. Enter any of them and edit the PKGBUILDs inside.
Create a Build Package
To create a new package, read the Arch Wiki, and make sure your follow Chakra standards.
If you are porting a build package from the CCR or AUR, check the standards too, since there are some differences between packages in the CCR and packages in the official repositories.
Once you have the PKGBUILD and other needed files ready, put them in a folder with package's name, and put that folder into the right buildroot/repository-branch-architecture/pkgbuilds/ folder.
Build a package
Go into any package folder and use these commands:
cd <package_name>
../makepkg -rs
The buildsystem's special makepkg script allows package signing, along with other useful extras. The -rs option tells makepkg to get all the dependencies and remove them after building, which is important.
You don't have to worry about package signing unless you have commit support.
Clean the Package Directory
Once compiled, clean package_name folder, and just leave the PKGBUILD file and any .install file, ChangeLog or patches. That is, the files that was already in the folder before running Template:Link. Then check what additional files are there or what have you changed:
git status
There should be no additions, since you have already deleted those files created during the build process. If there is any unexpected untracked file, remove it and run git status again.
Note that when a package successfully compiles, it is moved to _repo/local, and the .pkg.tar.xz file in package's folder is just a symlink that Git will ignore. That means, you don't need to delete it (but you can).
Test your package
If you are working on a package for the same branch and architecture as yours, you should test it in your own system before submitting it to the Git repositories.
Exit your chroot, go to buildroot/repository-branch-architecture/packages/local/, and install it with:
cd buildroot/<repository-branch-architecture>/packages/local/
pacman -U <packagefile>.pkg.tar.xz
Then run it in your system, and once you have checked it works as expected, jump to the next step.
Upload the PKGBUILD to a fork
If you do not have direct commit privileges (which means most people), you should fork our repository, upload your changes to that fork, and send a merge request to contribute your changes to Cherimoya.
First, go to the Cherimoya Packages page on Gitorious. Create an account, make an ssh key, and then go back to our page. Click Clone Repository on the repo you want to submit a change to.
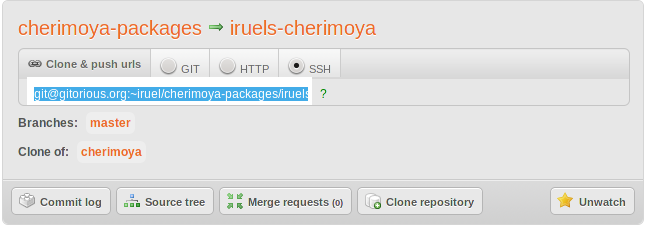
You will end up with a link in the middle of the box, as shown in the image to the right. Copy that link, and put it in place of <link> below:
git remote add fork <link>
After that, you can commit and add files like any git repo, with the exception of the "push" command:
- git status Just to make sure the changes are correct.
- git add package_name Where package_name is the name of the folder containing the package. You can add more than one folder, or repeat this step for other packages, in case you added more than one. If you are updating an existing build package and didn't add any new file, skip this step.
- git commit -am Here, write a description of the changes you made. Example: Added 'package1' and 'package2'..
- git push fork master This is what actually send the changes to the Git repository. The third argument to Git, the branch, is usually master.
Once you've pushed your commits, go to your forked repository and click "Request Merge" to send your changes for approval. You're done!
Upload the PKGBUILD
If you have direct commit privileges, you can upload the PKGBUILD to Git. Enter the chroot again, and run:
- git status Just to make sure the changes are correct.
- git add package_name Where package_name is the name of the folder containing the package. You can add more than one folder, or repeat this step for other packages, in case you added more than one. If you are updating an existing build package and didn't add any new file, skip this step.
- git commit -am Here, write a description of the changes you made. Example: Added 'package1' and 'package2'..
- git push origin branch This is what actually send the changes to the Git repository. The branch is the one your chroot was made for, usually master.
Updating an existing package
First thing you need to do is to update the PKGBUILD of the application you are updating. Usually this is as simple as checking the CCR or AUR for a newer version of that package. Once you've found an update, just port it over and test it.
In the case of Firefox Addons, it's not difficult either; Check for a newer version at Firefox's addon site.
When working with PKGBUILDS:
- Change the pkgver variable to its new version, or increase the pkgrel variable if you are rebuilding the same version of the package (i.e. with an additional patch).
- Update the md5sum (if sources changed). You need to run ../makepkg -g >> PKGBUILD to do that, and should then move the new md5sum to its right position, after the source variable.
Then you can follow the steps to add a new package, just skipping the first one (build package creation).
Delete a package
To delete a package or group of packages from a repository, run:
remove.sh package_name
Move a package
To move a package or group of packages from a repository to another, run:
move.sh package_name target_repo
Maintenance
Update
Don't forget to run the update script from time to time:
cd buildroot
./update-buildsystem.sh